Business Rules is new functionality in Microsoft Dynamics CRM 2013, with Business Rules you can apply form logic without writing JavaScript code. Business rules provide a simple declarative interface to implement and maintain fast changing, commonly used business rules that will be applied to Main and Quick Create forms for both the web application and Microsoft Dynamics CRM for tablets.
What can Business Rules do?: Business rules allow for a subset of the capabilities provided by form scripts. With Microsoft Dynamics CRM 2013 and Microsoft Dynamics CRM Online, you can define conditions and apply the following actions:
- Set field values
- Set field requirement levels
- Show or hide fields
- Enable or disable fields
- Validate data and show error messages
Business rules can be set to apply to all Main or Quick Create entity forms or specific Main forms that you choose. You can transport business rules from one organization to another by including them in a solution and you can install solutions that contain business rules.
Configure Business Rules: First, you need to have the privileges necessary to navigate to Settings > Customization. This typically requires the System Administrator or System Customizer security role. To activate a business rule, you must have the Activate Business Rules privilege.
There are four ways you can view, create, or edit business rules:
1. Solution -> Entity From a solution, such as the default solution, you will find a Business Rules node for all entities.

2. Solution -> Entity -> Field When you view an entity field, you will find a Business Rules node that will show you only the business rules that include this attribute.

3. Form Editor From the form editor, you can use the Business Rules button in the ribbon to show the Business Rules Explorer on the right side. This will show you all business rules that will be applied just for this form. If you create a rule from the form editor, the default scope is for that form.

4. Form Editor -> Field When you view the properties for a field that is used in a form, you will see a Business Rules tab that shows you the business rules that include this attribute. If an existing rule is similar to a rule you want to make, you can open that rule and use the Save As button to copy an existing rule as a starting point for a new rule.

Set the scope: In the top right of the form, use the Scope field to set the scope for the rule to All Forms or choose any one of the Main forms. You cannot select multiple specific forms. If you choose All Forms, the rule will be applied to all the Main forms and the Quick Create form, as long as the form includes all the fields referenced by the rule. If you create a new business rule by using the form editor, the default scope is just that form.

Configure Conditions:If you want to change an activated business rule, you must deactivate it before you can edit it.
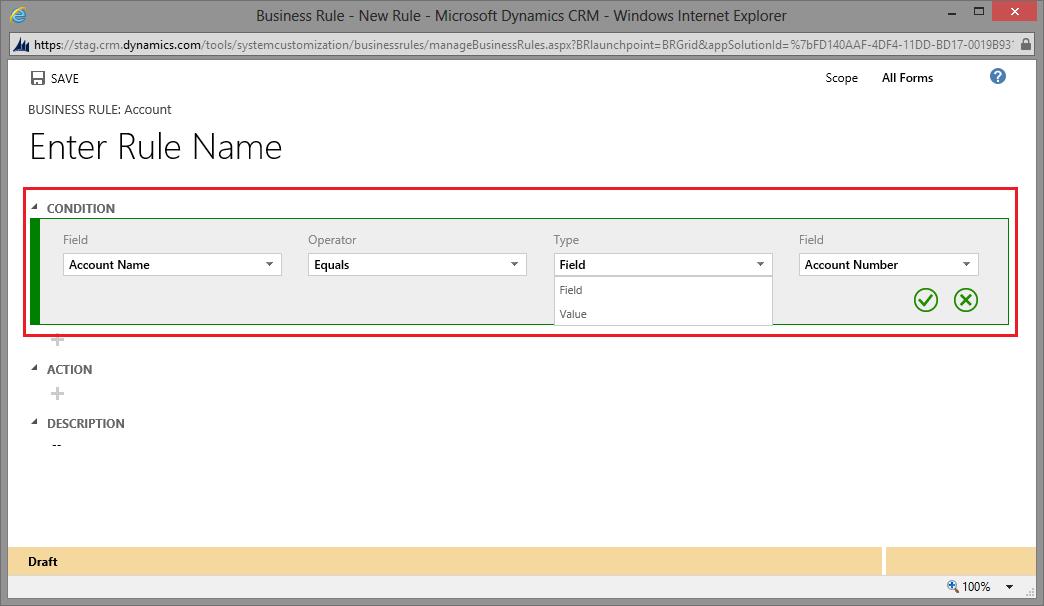
To add a condition, click the + icon and a new condition row will appear with default values set. Enter the field name to set the Field, and then choose the appropriate Operator. Operator options will change depending on the data type of the field.
Conditions are checked whenever any field referenced within the condition changes.
You can chose three different types of conditions:
Field: Use this type to compare the value of one form field with another.
Value: Use this type to compare the value of one form field with a value you enter.
Formula: This option appears only for numerical or date data types. It does not appear for fields that contain text. Use this type to compare the result of a simple calculation that may use either a value in another form field or a value you enter.
When you are finished entering or editing the rule, click or tap the check mark icon to save it or the (X) icon to discard changes. To remove a previously saved condition, place your cursor over the condition and click the pauseǁicon.
Configure Actions: To add an action, click the + icon and you will have the following options:
1. Show error message: Use this action to set an error message on a field if the data within it is not valid. The text you specify for the message will be displayed with an error icon near the field.
The record cannot be saved as long as this message is displayed. After the data in the field has been corrected according to the conditions set in your rule, the message will disappear and the record can be saved.
2. Set field value: Choose the Field and Type. There are three types:
Field: Use this type to set the value of one form field with the value of another field.
Value: Use this type to set the value of a form field with a value you enter.
Formula: This option appears only for numerical or date data types. It does not appear for fields that contain text. Use this type to set the value to the result of a simple calculation that may use either a value in another form field or a value you enter.
3. Set business required:Use this type to change the requirement level for the field. The options are Not Business Required and Business Required. There is no option to set this to business recommended.
4. Set Visibility: Use this type to change whether the field is displayed in the form. The options are Show Field and Hide Field.
5. Lock and unlock field: Use this type to change whether the field is enabled in the form. The options are Lock and Unlock. When the field is locked, people will not be able to edit the value in the field.
After you have defined an action, you can change the order or delete it by using the options available when you place your cursor over the action.

Set the description: Setting a description is optional. It isn’t displayed anywhere else except in the business rule editor. But it is a good idea to include a description of what the rule is supposed to do and why it has been added.
Test and activate business rules: Before anyone can use the business rules you have created, you must activate them. Before you activate them, you should test them. You can test business rules by using the Preview button in the form editor.
Limitations for business rules: Business rules in this release are intended to address common actions. Compared to what a developer can do by using form scripts, business rules have limitations. However, business rules are not intended to replace form scripts.
The primary limitation you may find compared to form scripts is that all conditions in the business rules are evaluated using AND. All the conditions must be true before the actions will be applied. There is no support for OR or Else operators to provide for more complex logic. To apply OR in your conditions, you need to create separate rules for each condition you want to test. This can be done efficiently by using the Save As option and creating separate rules for each condition you want to test.
Here are some other limitations to using business rules:
- Business rules run only when the form loads and when field values change. They do not run when a record is saved.
- Business rules work only with fields. Form scripts can interact with other visible elements, such as tabs and sections, within the form.
- When you set a field value by using a business rule, any OnChange event handlers for that field will not run. This is to reduce the potential for a circular reference, which could lead to an infinite loop.
- If a business rule references a field that is not present on a form, the rule will simply not run. There will be no error message.
- Whole Number fields that use the formats for TimeZone, Duration, or Language will not appear in the rule editor for conditions or actions, so they cannot be used with business rules.

Very Good Article. from this article got to know about Business rule that i never used.
Thank you.
Good article. Thank you for this. Unfortunately I ran into a problem;
I have created a business rule on the Quantity field in the OpportunityProduct entity.
Condition: If Quantity does not contain data
Action: Set Quantity to “1”
After loading the form, the following error occurs:
There was an error with this field’s customized event.
Field: window
Event: onload
Error: Object doesn’t support property or method ‘getDataValue’
What am I doing wrong here?
Pingback: CRM 2013 – Understanding Business Rules | Hosk's Dynamic CRM Blog
Pingback: CRM 2013 – Understanding Business Rules - Microsoft Dynamics CRM Community
are you using a business process flow?